1. Installation
There are two options for installing on a build server, which are covered in more detail below:
MSI Installer
The same Mist installer that is used to install the product on developer workstations can also be safely used to install on a build server. The installer will make the following changes to your system:
- Create a single registry key under HKCU\Software\Varigence\Mist\3.0 with 3 values that are used to track licensing information
- Copy roughly 45 MB of files to %PROGRAMFILES%\Varigence\Mist\3.4
- Install 2 links into the start menu
No assemblies are installed into the Global Assembly Cache (GAC). No files are installed into shared locations. The installation is very self-contained.
XCopy Deployment
Many organizations prefer to use a deployment strategy that excludes the use of MSI-based installers. Mist also supports XCopy deployment. The following steps must be employed to perform and XCopy installation:
- Use the Mist installer to install the product on a VM or developer workstation
- Copy all files located under %PROGRAMFILES%\Varigence\Mist\3.4 to the preferred path on the build server
No further steps are required.
Minimal XCopy Deployment
In extremely locked-down environments, it may be desired to install only the critically necessary components for the build server. Mist also supports this scenario. The instructions for the XCopy Deployment should be used, except instead of copying all files, just the following minimal set of files for a non-interactive build server should be copied:
- AdfEmitter.dll
- Antlr3.Runtime.dll
- Biml.dll
- Bimlc.exe
- BimlCoreLowerer.dll
- BimlDataflowEngine.dll
- BimlDocumenter.dll
- BimlEngine.dll
- BimlExtensions.dll
- BimlResources.dll
- BimlValidator.dll
- DacpacEmitter.dll
- FlowFramework.dll
- Ionic.Zip.Reduced.dll
- Languages.dll
- LogicNP.CryptoLicensing.Generator.dll
- Microsoft.CodeDom.Providers.DotNetCompilerPlatform.dll
- Newtonsoft.Json.dll
- SsasEmitter.dll
- SsasTabularEmitter.dll
- SsisEmitter.dll
- SsisImporter.dll
- Utility.dll
- Varigence.Biml.targets
These files total under 20 MB and can be installed into any directory on the build server.
Please note that when mist.exe, hadron.exe, or the MSBuild task are executed, configuration and temporary files may be automatically created under the local profile folder and the temporary folder for the user that owns the executing process. This applies to both XCopy and MSI-based installations
2. Entering the Product Key
There are multiple options for entering license key information, which are detailed in the following sections.
Important Note!
License keys are stored on a per-user basis. You must ensure that the user account that will run the recurring build service is used to enter the license key information. If a different account is used, the build service will report an invalid or missing license key.
Mist UI
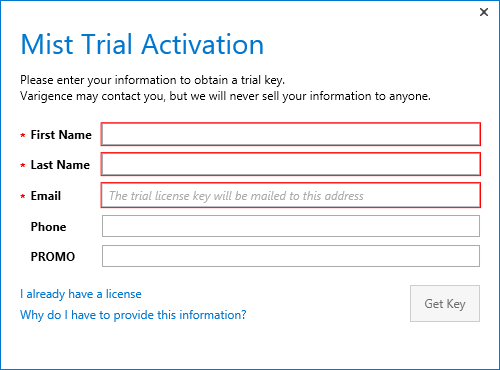
The Mist user interface provides a convenient mechanism for entering license information. When first running the Mist executable under a given user account, the following dialog will be displayed:
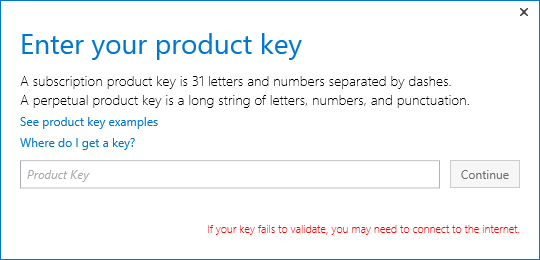
Click “I already have a license”. Then you will be presented with the following dialog:

Enter your product key and click “Continue”.

If your product key validates successfully, you are done with licensing. The product key will be registered for all applications, including Mist, the Hadron command line compiler, and the MSBuild task.
Hadron Command Line
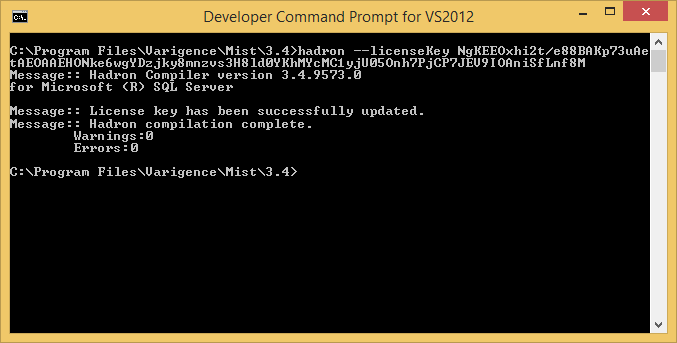
If Mist was not installed (due to a minimal xcopy deployment) or if the build engineer would prefer to create a fully automated installation process, the product key can be entered directly via the command line using the hadron.exe command line compiler. As shown in the screenshot below, simple execute “hadron.exe –licenseKey” followed by the product key supplied by Varigence. This product key can be either the short format (31 alpha-numeric characters and looks like XXXX-XXXXX-XXXXX-XXXXX-XXXXX-XXXXX-X) or the long format (variable length string with alphanumeric and punctuation). If your product key validates successfully, you are done with licensing. The product key will be registered for all applications, including Mist, the Hadron command line compiler, and the MSBuild task.


Comments
Bertrand Renotte
10:34am 11.07.14
Exactly what I'm looking for. Can't wait for second part of the article !